


Auto-Reverse Brake
ADJUSTING THE AL-KO AUTO-REVERSE BRAKE
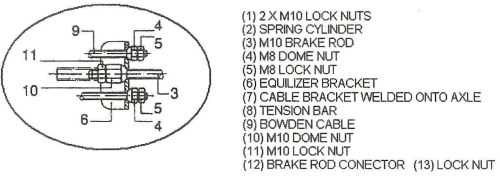
For clarity refer to the accompanying drawings
1. Raise the trailer wheels off the ground
2. Slacken the lock nut (no.11) and dome nut (no.10) away from the equalizer bracket (no.6)
3. Slacken the lock nuts (no.11) away from the spring cylinder (no.2)
4. Make sure the coupler head and shafts are fully extended in the towing position, and that the hand brake is fully released
5. The brake rod (no.3) must not protrude through the brake rod connector (no.12) more than 3mm, as this will impede the function of the slot
6. From this point on the wheels must only be turned in a forward direction and never in reverse
7. Use a screw driver to adjust the brake adjuster through the hole in the back plate, until the wheel locks in the forward direction (as the brake shoes are floating this will centralise the brake shoes with the drum). Slacken the adjuster until the wheel spins freely in the forward direction
8. Bring the dome nut on the brake rod (no.10) in to touch the equalizer bracket (no.6). Bring one of the M10 lock nuts (no.1) in close to the spring cylinder (no.2). Pull the hand brake up hard and check that the equalizer bracket (no.6) stays parallel to the axle beam, if not release the hand brake and adjust the dome nuts (no.4) on the cable. Repeat the operation until the equalizer bracket remains parallel to the axle. Then lock the dome nuts (no.4) and lock nuts (no.5) together. Care should be taken during this operation so that the wheels do not turn backwards when applying the hand brake.
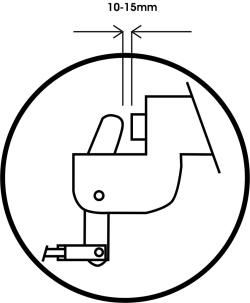
9. Release the hand brake. Slacken the M10 nut (no.1) away from the spring cylinder (no.2) approximately 30mm +, and pull the overrun lever situated behind the coupler shaft (see insert). When you give the lever a good pull there should be a 10-15mm gap between the lever and the shaft - You get this by adjusting the 10mm dome nut (no.10). When you have the 10-15mm gap, lock the dome nut (no.10) with the lock nut (no.11)
10. Bring the lock nut (no.1) in close to the spring cylinder (no.2) leaving about 0.5mm between the cylinder and the nut. Then lock the nut in place with the other lock nut (no.1)
THE BRAKES ARE NOW SET
To test the setting, pull the hand brake up to the end of the ratchet, the 2 x lock nut (no.1) will compress into the spring cylinder. Turn the wheels backwards. The wheels should lock forward and backwards.
Push the head and shaft fully into the coupler body until the head pushes against the coupler body, which is quite difficult as you are compressing the shock absorber, this simulates when you reverse the trailer. Release the handbrake holding the shaft in the compressed position. The wheels should now turn with resistance in reverse, but not forwards.